因为工作的关系接触了一些iot漏洞挖掘,因此想在工作之余补充一些二进制的漏洞利用的基础知识。
环境的坑
这里环境用的是pwndocker最新版,免去使用虚拟机的痛苦,但是依旧有很多问题需要解决,这里记录下一些踩坑的经验。
将pwntools升级为最新版,4.5版本运行exp可能报错。
pwntools配合gdb在tmux中调试可能会遇到卡死的问题,因此需要修改源码。参考这篇文章:
https://blog.csdn.net/weixin_43483799/article/details/118885208,
主要问题是在dist-packages/pwnlib/util/proc.py的 wait_for_debugger函数在
1
while t.timeout and tracer(pid) is None
无限循环执行,最后修改为,解决问题
1
2
3
4
5
6
7
8
9
10
11
12
13
14
15
16
17
18
19
20
#/usr/local/lib/python3.6/dist-packages/pwnlib/util/proc.py
def wait_for_debugger(pid, debugger_pid=None):
t = Timeout()
with t.countdown(timeout=15):
with log.waitfor('Waiting for debugger') as l:
while debugger_pid:
debugger = psutil.Process(debugger_pid)
#while t.timeout and tracer(pid) is None:
if tracer(pid) is not None: break
try:
debugger.wait(0.01)
except psutil.TimeoutExpired:
pass
else:
debugger_pid = 0
else:
while t.timeout and tracer(pid) is None:
time.sleep(0.01)
...
栈溢出
栈溢出基本原理
栈溢出的原理较为简单,其核心是因为程序将数据读取到变量中时,读取的数据量超过了该变量申请的字节数,导致对相邻栈中的变量的覆盖。实现对栈溢出的利用主要有三点:
- 存在栈溢出漏洞。(危险函数,函数使用不当等等,包括使用不明确边界的gets,scanf,read等等函数)
- 确定溢出区域的大小,计算公式是缓冲区大小+BP字节数,然后后续可以跟返回地址。(cyclic计算缓冲区大小)
- 实现恶意利用的gadget,主要的形式是通过返回地址为带有不同指令的gadget,完成参数设置,指向恶意函数等操作。(如何找gadget)
栈溢出保护机制
- RELRO,重定位只读,主要有两个保护措施:
- 部分 RELRO: 在程序装入后,将其中一段 (如.dynamic) 标记为只读,防止程序的一些重定位信息被修改
- 完全 RELRO: 在部分 RELRO 的基础上,在 程序装入时,直接解析完所有符号并填入对应的值,此时所有的 GOT 表项都已初始化,且不装入 link_map 与_dl_runtime_resolve 的地址 (二者都是程 序动态装载的重要结构和函数)。
- NX,栈上代码不执行,针对ret2shellcode这种攻击方式。
- CANNARY,在BP前插入的一段探测值,返回值前会校验改段值是否被修改,如果被修改则阻止利用。(相当于md5校验,不过这个实现其实是亦或fs:0x28的值)。
- PIE,开启地址随机化,能够有效防止ret2libc这种攻击方式。
ret2text
demo来自ctfwiki中基础ROP中的
先看下文件的一些基本信息,发现是个32位的linux程序。

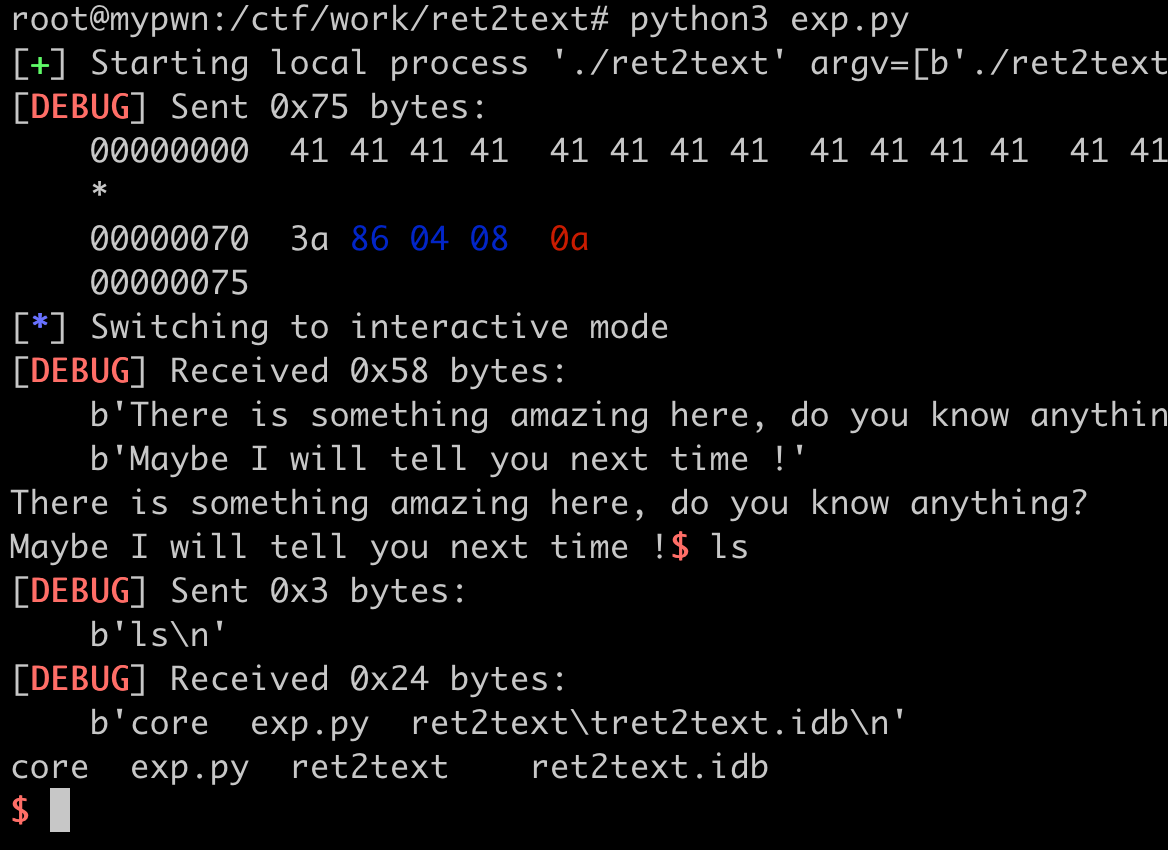
checksec 发现开了NX,随机地址没有开启,并且使用ida分析时发现了存在后门函数。
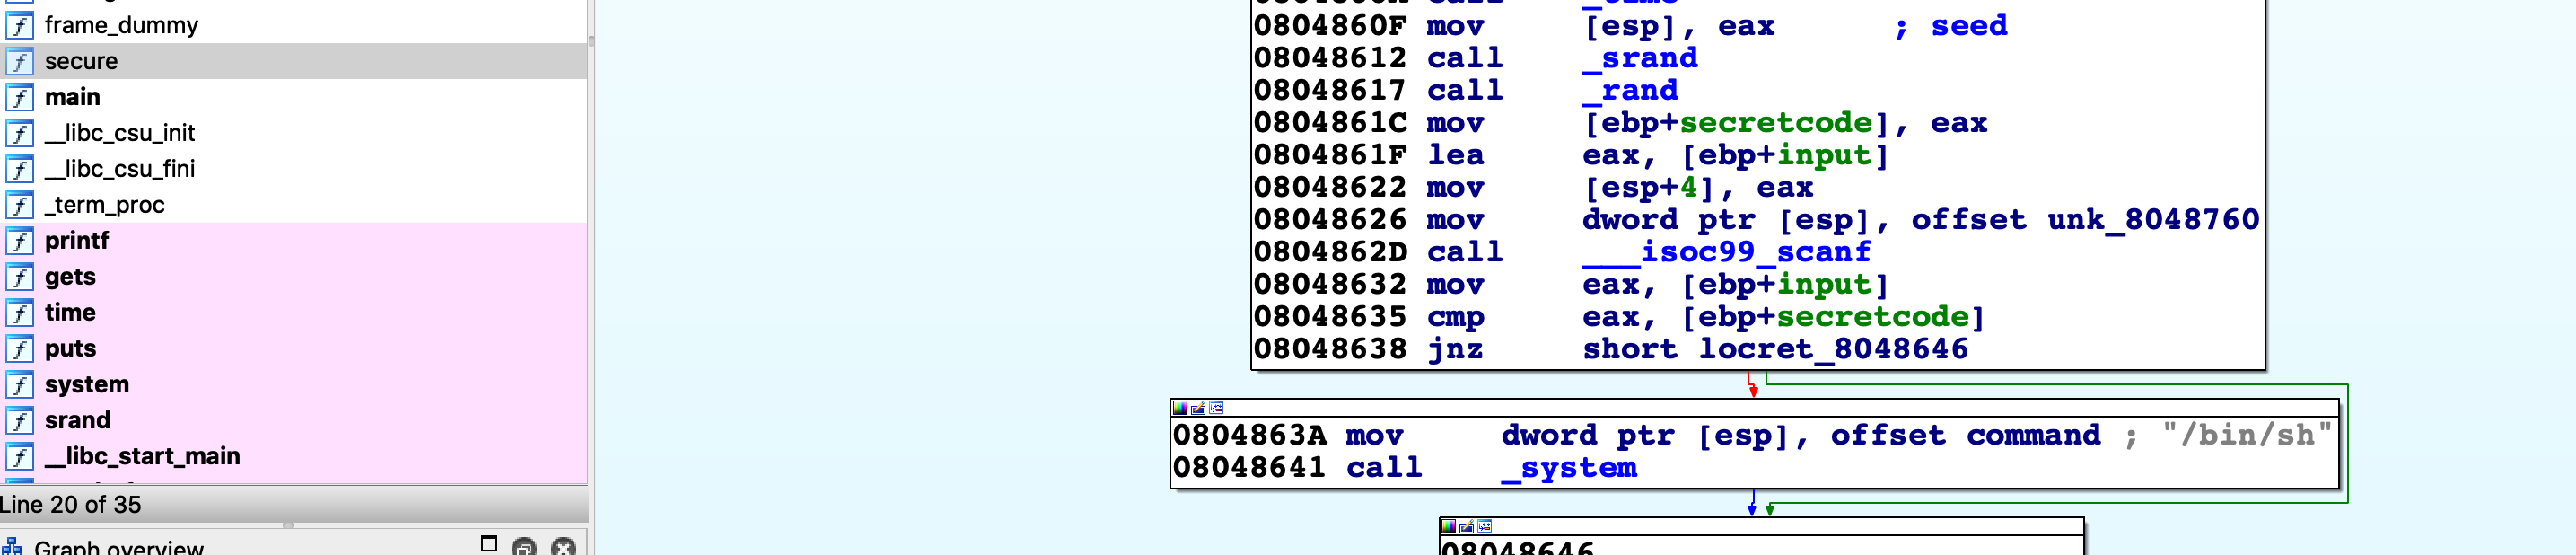
只要将return address设置为后门地址即可完成利用。
exp
1 | from pwn import * |
ret2shellcode
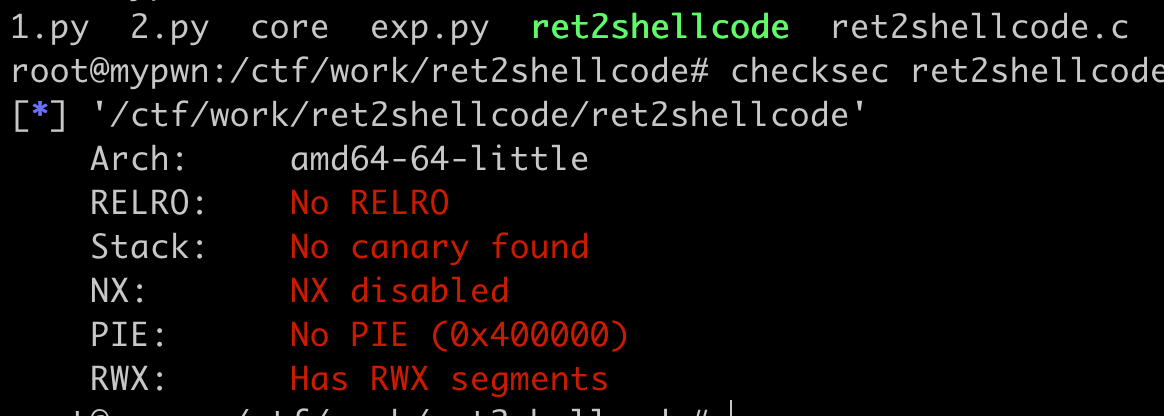
demo编译自ret2shellcode.c,64位应用。
编译命令:
1 | gcc ret2shellcode.c -z execstack -fno-stack-protector -no-pie -z norelro -o ret2shellcode |
1 |
|
checksec结果
gdb看下内存中的可执行情况。
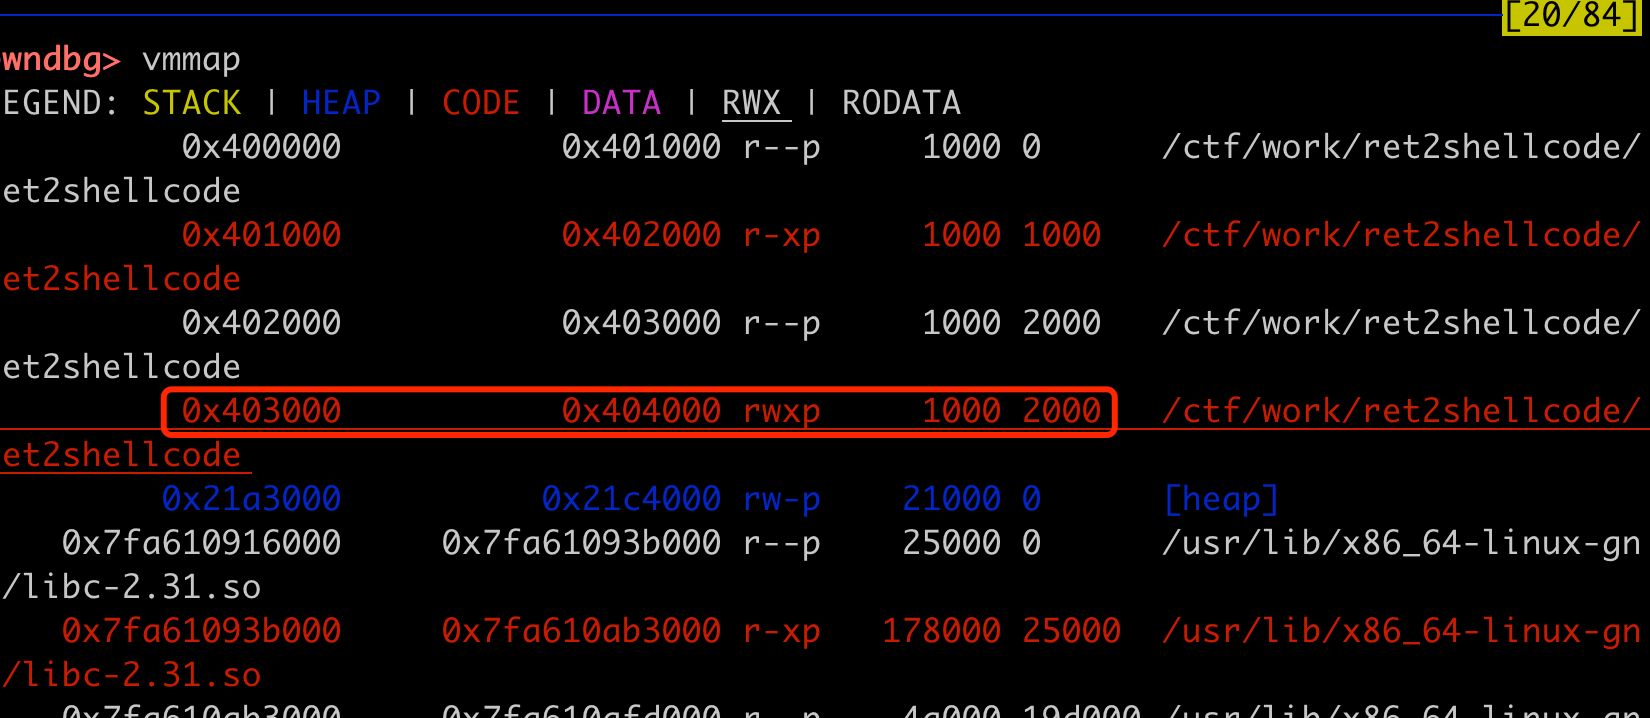
bss可写可执行,buf在bss上,在这里也就是0x40300-0x40400上,因此将返回地址设置为buf指针的地址,后续执行shellcode即可。
exp
1 | from pwn import * |
ret2syscall
ret2syscall,通过系统调用进行任意代码执行,也是ctfwiki下的案例。
先看下保护机制,开了NX和部分RELRO
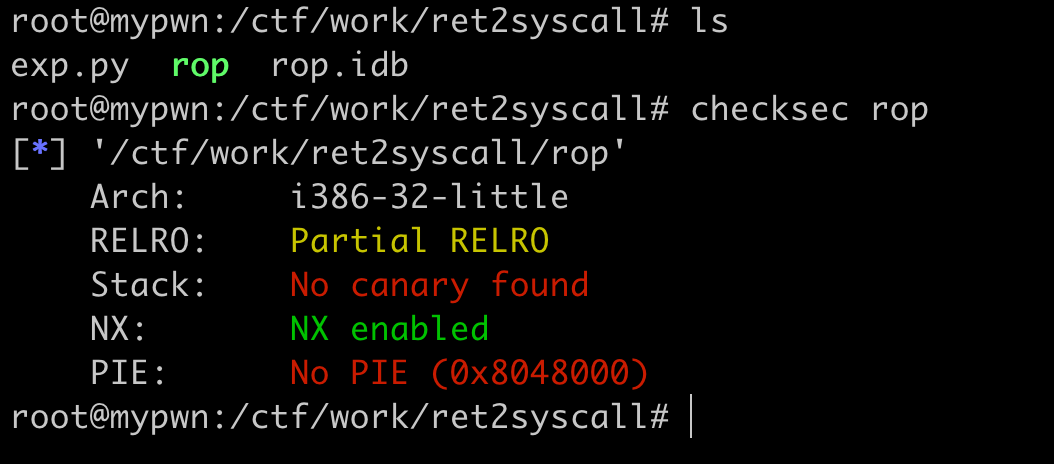
ida静态分析后发现,没有后门函数,因此需要自己构造利用。
这里需要用到系统调用的相关知识,在设置好各个寄存器参数后,再通过int 0x80来调用系统调用完成代码执行,执行的后门代码如下:
1 | execve("/bin/sh",0,0); |
因此参数设置如下:
- eax设置为execve的系统调用号,0xb。
- ebx,ecx和edx分别设置为execve的三个参数。
所以为了设置eax,ebx和ecx这些参数,我们需要寻找gadget,最好是以pop xxx,ret结尾,当然这是32位程序下的利用,64位的利用要稍微做调整,放置参数的寄存器分别是,edi,esi,ebx依次类推,这里以32位程序为例。
exp
使用ROPgadget寻找gadget,
1 | (ROPgadget --binary rop --only 'pop|ret' | grep 'eax',ROPgadget --binary rop --only 'pop|ret' | grep 'ebx') |
最后的exp如下:
1 | from pwn import * |
ret2libc
这里看下32位下的情况,当libc未知时。这里需要简单地说下对plt和got表的理解,plt是程序链接表,当程序需要找某个函数的地址时,就会去plt表中找所需的地址,got表是全局偏移表,got表的值代表了某个函数对基地址的偏移值。
思路主要分为两步:
- 通过溢出获取到某个特征函数的got表中的值,并且通过这个值来判断libc的版本。
- 通过libc的版本计算出system等函数的地址,然后后续布置对应的参数。
这里用ret2libc 3的案例。
exp
1 | from pwn import * |
有种情况,第一次溢出后直接ret到__libc_start_main函数的地址时,需要的溢出长度只有104(这个结论可以执行动态调试),并且直接运行exp的时候,可能打不通。这里需要指出的是_start是整个main函数运行的起始处,这个函数在调用__libc_start_main,会首先清除bp的值等初始化操作,可能这个操作会影响缓冲区的一些内容。
大概看下__start的代码,有一个有意思的地方,就是and esp, 0FFFFFFF0h指令,最终导致的结果是esp的值减少8,这就是为什么直接返回main的时候会造成只需要填充104位即可指定返回地址。
1 | public _start |
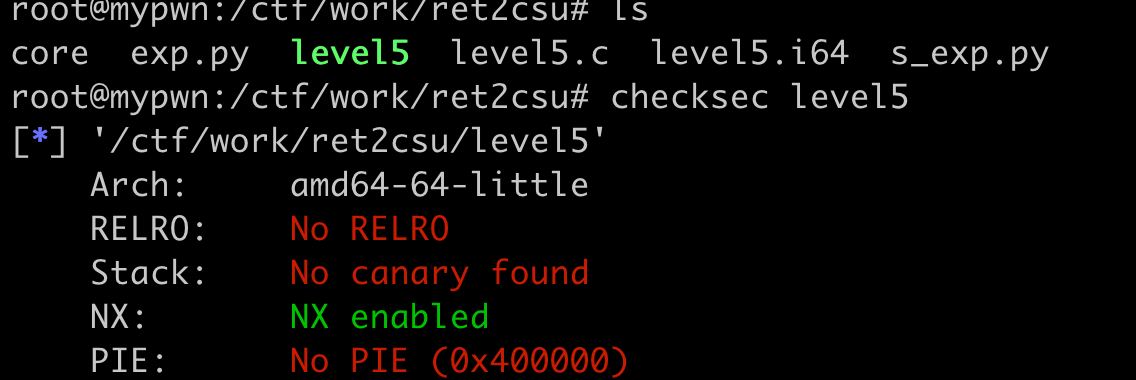
ret2csu
这里主要是x64下的一个通用gadget,包括设置参数和调用任意函数。
有两个汇编片段,第一个片段在溢出中,可以用于设置r12-r15的寄存器,然后第二个片段中,通过控制r15来指定使用的函数,di,si,dx分别对应第一到第三个参数,因此这个gadget可以在64位程序下调用任意函数并利用
1 | add rsp, 8 |
1 | mov rdx, r14 |
demo
1 |
|
exp
1 | from pwn import * |
总结
用了不少时间把改踩的坑都踩了,感觉二进制要踩的坑挺多的,比如那个ret2csu中的最后返回__start而不是返回__main的原因,如果不是自己去debug一遍,很难会注意到ctfwiki里面给出payload的问题。然后第二个就是一个好用的调试环境(这个环境踩了巨多的坑)会给exp编写的工作增加很多便利。